Est. Reading Time: 7 Mins
Choosing new furniture should be exciting, but many homeowners run into problems simply because measurements were skipped or taken incorrectly. Measuring your room properly helps you avoid furniture that feels too large, too small, or impossible to deliver.
According to Mary Lee Smyth, Interior Designer at La-Z-Boy Kingston, measuring is one of the most important steps in the furniture buying process. “Even beautiful furniture can become a regret if it does not fit the room or cannot be delivered into the space,” she explains.
This step-by-step guide walks you through how to measure your room, understand furniture dimensions, and prepare for delivery so you can shop with confidence and avoid costly mistakes.
Key Takeaways
- Accurate room measurements prevent overcrowding and delivery issues
- Understanding furniture dimensions helps you compare pieces more confidently
- A simple sketch improves furniture placement and spacing decisions
- Doorways, hallways, and stairs are just as important as room size
- Photos and videos help interior designers recommend better-fitting furniture
- Planning delivery access early avoids last-minute surprises
In This Article...
- How to Measure Furniture
- Before Starting, Gather the Right Measuring Tools
- Create a Rough Sketch of Your Room
- Measure Each Wall and Ceiling Height
- Measure Doors, Windows, and Openings
- Take Proper Photos and Videos
- Measure Entry Points for Delivery
- Frequently Asked Questions
How to Measure Furniture
Before measuring your room, you need to understand how furniture measurements are listed. Furniture dimensions typically include width, depth, height, and sometimes diagonal depth, all of which affect how a piece fits and moves through your home.
- Width is measured from the widest point, usually arm to arm
- Depth measures from the front of the seat to the back of the frame
- Height measures from the floor to the tallest point of the furniture
- Diagonal depth determines whether furniture can pivot through doorways or hallways
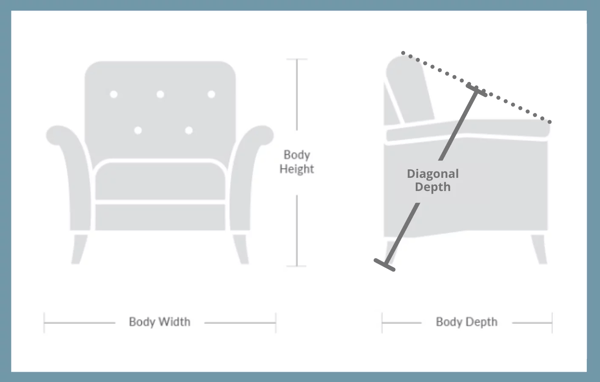
To measure diagonal depth, place a straight edge from the top back corner of the frame to the front of the arm. Then measure from the bottom rear corner up to where it meets the straight edge.
Mary Lee advises double-checking listings. “Always confirm whether the listed measurements are for the furniture itself or the packaged size. This small detail can make a big difference on delivery day.”
Step 1: Gather the Right Measuring Tools
Having the correct tools makes the measuring process smoother and more accurate. Measuring without proper tools often leads to rounded numbers and inaccurate assumptions.
Recommended tools include:
- A sturdy tape measure that is at least 25 feet long
- A laser measuring tool for long walls or hard-to-reach ceilings
- Pencil and paper or graph paper to record measurements
- A helper to hold the tape steady when measuring longer spans
Mary Lee adds, “The person holding the tape at the wall corner controls the accuracy. If that end slips, the entire measurement is off.”

Step 2: Create a Rough Sketch of Your Room
A rough sketch helps you visualize your room layout and understand how furniture will flow within the space. It does not need to be perfectly drawn or to scale.
Stand at the room entrance and sketch the room as if viewing it from above. Move in one direction around the room, labelling each wall and marking major features like doors and windows.
“This method ensures you capture every usable inch of the room,” Mary Lee explains. “It also makes it easier for designers to understand your space quickly.”
You can later transfer these measurements into a digital room planner if you want to experiment with layouts.
If you're also interested, you can opt to transfer your drawing and measurements to an online 3D room planner. La-Z-Boy has a 3D Room Planner for designers and customers to use for visualizing their space fully.
Step 3: Measure Each Wall and Ceiling Height
Measure each wall from corner to corner at floor level. Always measure twice to confirm accuracy and record measurements clearly on your sketch.
Be sure to record:
- Wall length
- Wall width
- Ceiling height
Ceiling height matters for tall furniture like bookcases, armoires, or wall units. Older homes and custom builds may have varying ceiling heights, so never assume they are standard.
“Measure in feet and inches to match how furniture is listed,” Mary Lee recommends. “That avoids confusion later.”
Step 4: Measure Doors, Windows, and Openings
Make sure to indicate where the doors, doorways, windows or any other wall openings are located. These are places you want to be aware of so your furniture doesn’t block those important spots.
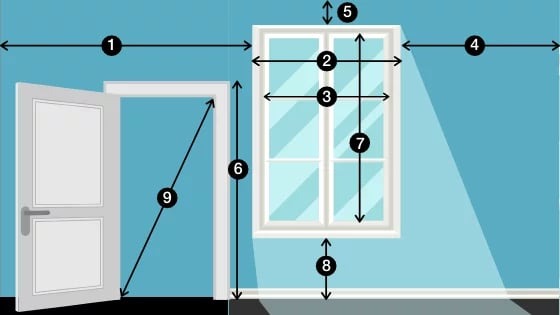
You want to record these measurements in two ways: (1) with the trim and (2) without the trim. The reason is that if there is a sill or trim on the bottom of the window, it might impede furniture placement. It is crucial with door measurements to know the width of the opening without trim to determine if the furniture can pass through.
As you face the door or window, you will need to record the following measurements:
- Left Wall Placement: measure from the left corner of the wall to the edge of the opening or trim.
- Width Including Trim/Frame: measure across the opening from the outside edges of the trim.
- Width Excluding Trim/Frame: measure across the opening from the inside of the trim (door: inside door jambs).
- Right Wall Placement: Measure from the right side of the opening trim to the right corner of the wall.
- Top Wall Placement: measure from the ceiling to the top of the trim.
- Height Including Trim/Frame: measure from the outside edge of the top trim to the outer edge of the bottom trim (or the floor for a doorway/entryway).
- Height Excluding Trim/Frame: measure the height from the inside edges of trim (for a door, from the head, the interior top frame, to the door sill, the inside bottom frame).
- Bottom Wall Placement: measure from the outer trim to the floor.
- Diagonal Depth Excluding the Frame (Important Door Measurement): measure from the inside top left corner of the door frame to the inside bottom right.
Also, measure the distance from each door or window to the nearest wall to ensure proper furniture placement.
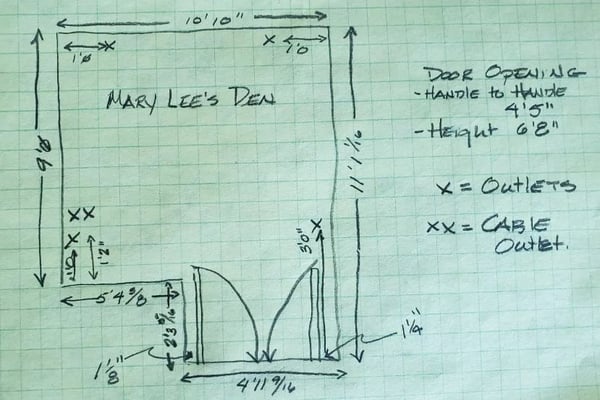
Your sketch should look a little similar to this one…
Step 5: Take Note of Additional Details in Your Sketch
Some elements in your room can impact furniture placement. You will want to take note of specific details and indicate their location on your sketch. These may include:
- Ceiling fixtures or fans
- Fireplace details/hearth
- Light switches
- Outlets
- Ductwork
- Floor or wall vents
- Radiators
- TV
These details can be critical to the overall design or furniture placement. It is also beneficial to take measurements of larger fixtures if they are close to the furniture.
If you have flooring, carpet or tiling projects, input your measurements into a square footage calculator. This can also help you determine material costs.
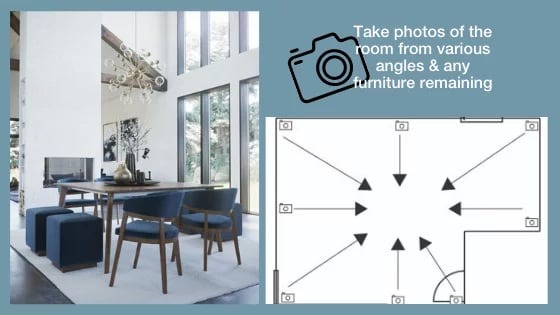
Step 6: Take Proper Photos and Videos
Photos and videos provide essential context that measurements alone cannot capture. They help designers see proportions, traffic flow, and existing furniture.
Mary Lee emphasizes framing. “We need to see the entire piece and the entire wall. Partial photos make accurate recommendations much harder.”
Best practices include:
- Use horizontal orientation
- Stand in room corners for wider views
- Avoid zooming unless showing fabric or details
- Record short videos to show the layout and obstacles
A video is also a great way to show off the furniture piece. Although there is no need for talk in the video itself, you should also let the interior designer know of any obstructions in the room that could potentially impede the furniture placement (doorways, windows, outlets, etc.)
Lastly, consider taking photos of the entire room to augment your sketch. Capture photos of the room from various angles, as shown in the image. Additionally, take pictures of any furniture pieces you would like to remain in the room.
Step 7: Measure Entry Points for Delivery
Delivery access is one of the most overlooked steps in furniture planning. Even perfectly sized furniture can become a problem if it cannot fit in the room.
Make sure to measure:
- Entry doors
- Hallways
- Staircases
- Turns, landings, and railings
If the doorway clearance is wider than the furniture width, the piece can move horizontally. If not, it may need to tilt vertically, which requires sufficient doorway height.
“If a piece is wider than both the doorway width and height, delivery becomes extremely difficult,” Mary Lee warns.
On delivery day, plan the best path into your home. Decide which entrance is the most direct, whether it’s the front, side, or back, and check for any barriers like narrow porches or sharp turns. Taking these steps ensures a smooth delivery and prevents unwanted surprises.
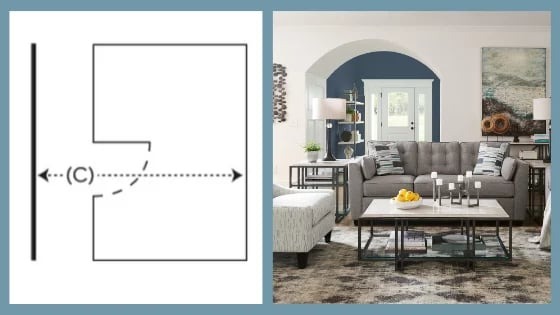
If the entryway clearance (C) exceeds the piece’s width, you can move it horizontally. Alternatively, if the entryway clearance (C) is less than the piece’s width, you must move it vertically, meaning that the entryway height must exceed the furniture’s width.
WARNING: You’ll find yourself in a real pickle if the piece’s width exceeds both the entryway clearance and height.
FAQs
What’s Next?
With your room measurements and sketch in hand, you’re ready to choose the perfect piece of furniture that fits your space beautifully.
Need some help? Book a consultation with one of our expert interior designers in our La-Z-Boy locations in Ottawa, Gatineau or Kingston! Our team will guide you through the entire process and create a 3D room design that brings your vision to life.
While you’re browsing, check out our top furniture collections for inspiration:
If you want to learn more about La-Z-Boy in general, take a look at this comprehensive furniture buyers guide.
Related Articles:
How to Choose the Right Coffee Table Size & Shape
How to Choose the Right Stool Height
5 Tips to Avoid a No Fit Delivery
(1).jpg?width=150&height=150&name=9C8A3062-Enhanced-NR%20(1)(1).jpg)